How I Built a WordPress Block Theme Using Google Stitch, Claude Code, and WordPress Studio
Published on
–
10
min read
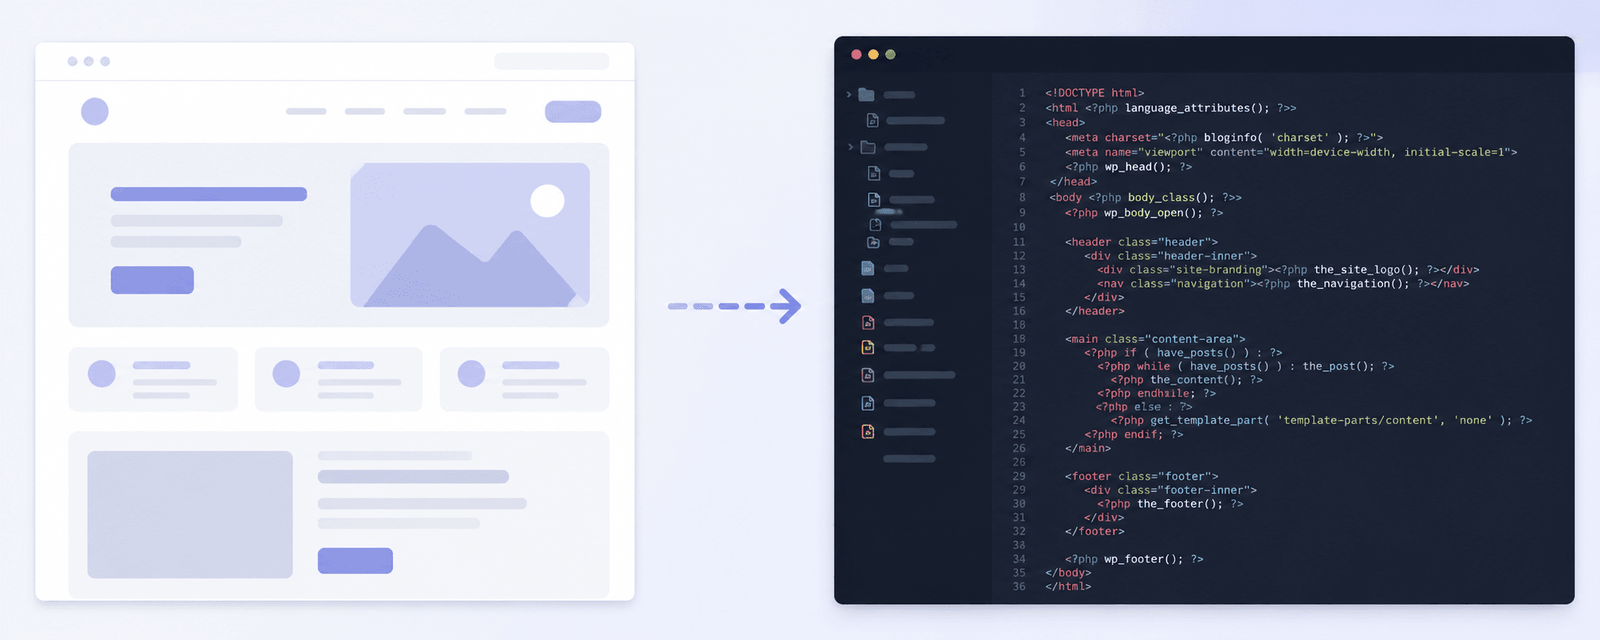
The WordPress block theme on this blog is new, and I built it using an AI pipeline I had not personally seen documented anywhere as yet. It involves three tools working in sequence: Google Stitch for design, Claude Code with a community Agent Skill called stitch-to-wp-theme-skill to convert that design into a block theme, and WordPress Studio’s MCP server to validate and fix the result. Therefore, I want to write it up while the process is fresh in case others want to give it a try.
I should be upfront about what this is and is not. It is not a one-click solution, and it does require some familiarity with WordPress block themes. What it does is remove a substantial amount of repetitive scaffolding work (the design token mapping, the Tailwind-to-block-markup translation, the initial theme structure), so you can get on with the parts that actually need your attention.
Here is how each stage works, what each tool contributes, and where you will still need to step in yourself.
Before You Start
This workflow assumes you are comfortable with the following:
- WordPress block themes and the Site Editor
- Basic understanding of
theme.json - Claude Code is installed and working on your machine (see the Claude Code docs)
- WordPress Studio installed (free download from WordPress.com)
You do not need to be a PHP or JavaScript developer to follow this, but some familiarity with WordPress theme structure will help when reviewing what Claude Code generates.
You also don’t need to use Claude Code; any other AI development tool, like Cursor, Codex, OpenCode, etc., will work too.
Stage 1: Designing with Google Stitch
The first tool in the pipeline is Google Stitch, which is currently in beta. It is an AI design tool that generates UI layouts for web and mobile applications from text prompts. You describe what you want, it generates a layout, and you iterate from there. The important thing for this workflow is not the visual output. It is what the export actually contains. When you download a completed design from Stitch, you get:
- An HTML file implementing the layout using Tailwind CSS
- A screenshot of the design (
screen.png) - A
DESIGN.mdfile that describes the design system: colours, typography, spacing, and component rules
That is what makes Stitch useful here rather than just generating a screenshot. Because the next stage of the pipeline needs to parse and translate the design into WordPress block markup, a real HTML file with an extractable Tailwind config is far more useful than a PNG or a Figma export.
To kick things off i started with a generic prompt like this example below only specifying i’d like to use a “sophisticated utility” and specifyng the pages I wanted.
I want to redesign my personal blog to be more modern as it’s design looks quite outdated at the moment. My blog is https://stuartduff.com. I’d like to redesign the theme using the “sophisticated utility” apporach. I’d like examples of a homepage, blog post archives and a single post page.
I used Stitch iteratively, prompting and refining until I had a layout I was happy with. It took several rounds, adjusting the header, trying different approaches to the blog listing layout, and settling on a typographic scale. You can steer it fairly precisely once you understand what kinds of prompts it responds to well. When I had something that felt right, I exported it and moved on.
What I eventually settled on were two examples of a light and dark theme, so I could evaluate both colour decisions.
Dark Example

Light Example

One practical note: Stitch is still early software, and some exports are cleaner than others. If your HTML export looks sparse or the Tailwind config is thin, it is worth refining the design a little further in Stitch before proceeding. The conversion in Stage 2 is only as good as the input it receives.
Stage 2: Converting the Stitch Export to a Block Theme with Claude Code
With the Stitch export in hand, the next step is to convert it into a WordPress block theme. For this, I used Claude Code (Anthropic’s AI coding agent) with a community-built Agent Skill called stitch-to-wp-theme-skill, created by Ross Mulcahy.
What are Agent Skills?
Agent Skills are instruction files that tell an AI coding agent how to approach a specific kind of task. Rather than re-explaining your requirements every session, you install the skill once, and the agent reads it as part of its operating context. In practice, this means the agent already understands WordPress block theme conventions, file structure, and common pitfalls before you type a single prompt. The WordPress community has published a set of them at github.com/WordPress/agent-skills. They cover block development, plugin development, the REST API, and block themes. The stitch-to-wp-theme-skill is a separate community contribution that builds specifically on that foundation.
Installing the skill
For the Stitch skill specifically, follow the installation instructions in the repository README. At the time of writing, it is a single SKILL.md file you add to your project or global agent configuration. I simply dropped the SKILL.md file into the folder where I have downloaded the stitch files too.
We’ll come to enabling the WordPress skills and MCP in WordPress Studio further down in this post.
What the skill does
Once the skill is installed and you point Claude Code at your Stitch export folder, it works through a structured ten-step process.
Analysing the Stitch exports. It reads the DESIGN.md, the HTML files for each page and the screenshot references. From the HTML, it extracts the Tailwind config, custom CSS, font imports, and icon system.
Mapping design tokens to theme.json. Tailwind colour values become settings.color.palette entries, font families become settings.typography.fontFamilies, and text sizes become settings.typography.fontSizes, using clamp() for display sizes where appropriate. The skill disables WordPress’s default palettes so only your design tokens are available to editors.
Deciding what needs a custom block, a native block, or a pattern. This is one of the more important things the skill gets right. Its core principle is native blocks first, only generating custom blocks when core blocks genuinely cannot do the job. Hero sections become wp:cover, logos become wp:site-title or wp:site-logo, social icons become wp:social-links, and navigation becomes wp:navigation. Custom blocks are reserved for components that need interactive behaviour, server-side data queries, or form submissions. This matters because unnecessary custom blocks are a common source of problems in the Site Editor.
The Tailwind-to-block markup translation is where most of the work happens. A few examples of how the skill maps things:
| Tailwind | WordPress Block |
|---|---|
max-w-7xl mx-auto | wp:group with constrained layout |
grid grid-cols-3 | wp:columns with three wp:column blocks |
bg-primary | backgroundColor attribute using theme.json slug |
sticky top-0 | CSS class (not a block style attribute) |
flex | Group block with flex layout |
Building out the theme structure. The skill generates the full theme folder: style.css, theme.json, functions.php, templates, template parts, patterns, and block source files for custom blocks.
Creating a Blueprint for testing. It also generates a blueprint.json for WordPress Playground, so you can open the theme in a browser-based WordPress instance with sample content to check it quickly without needing a local setup.
Shown below is an example of the type of prompt I used in Claude Code.
Using the SKILL.md file in this folder can you read all of the files within the folder. After you have completed that task begin creating a block theme from those files using the information included within the skill.
What to expect from the output
The skill produced a well-structured starting point, not a finished theme. The generated block markup had errors. Some blocks showed as “Unsupported” in the Site Editor; there were instances of wp:html blocks (which cannot be edited in the Site Editor and need replacing with native alternatives), and a handful of validation errors where block attributes did not match what WordPress expected. None of this was surprising, and it is exactly what the next stage of the pipeline is designed to address.
Stage 3: Validating and Fixing the Theme with WordPress Studio MCP
WordPress Studio is a free desktop application for local WordPress development. It is built on WordPress Playground, which means there is no need to configure Docker, NGINX, Apache, or MySQL. You open it, create a site, and it is running in seconds.
What makes Studio particularly relevant here is that it exposes an MCP (Model Context Protocol) server. Connecting Claude Code to this server gives the agent direct access to your running local WordPress site — not just the files on disk, but the ability to run WP-CLI commands, take screenshots of the actual frontend, and verify changes against a live environment. Without that connection, Claude Code is essentially editing files blind — it cannot tell whether a block actually renders correctly or throws an error in the Site Editor.
Setting up the WordPress Studio agent skills
The first step is to install and enable all of the agent skills in WordPress Studio. This is done by navigating to Settings > Skills in WordPress Studio. On that page, install all the skills you see, as shown in the example below.

Setting up the MCP connection
To connect Claude Code to WordPress Studio:
- Open WordPress Studio and create a new local site (or use an existing one).
- Go to Settings > MCP in Studio.
- Copy the JSON configuration shown there. It will look something like this:
{
  "wordpress-studio": {
    "command": "studio",
    "args": ["mcp"]
  }
}- Add this to Claude Code’s MCP configuration. The configuration file location for Claude Code is typically in your project or global agent settings — check the Claude Code MCP docs for the exact path on your system.
- Restart Claude Code and confirm it has connected to Studio.
Alternatively, you can just paste the MCP code above directly into Claude Code and ask to install and set up the MCP server for you 😉
Once connected, you should install your generated theme into the local Studio site. You can do this by copying the theme folder into the wp-content/themes directory for that site, then activating it through WP Admin.
Running the block theme validation
With the connection established and you have the WordPress Studio Agent Skills installed, you can ask Claude Code to validate the theme against the running site. The WordPress Studio skills will then begin to validate component checks for:
- Blocks showing as “Unsupported” in the Site Editor (usually caused by missing
edit.jscomponents in any custom blocks that were created) - “Block contains unexpected or invalid content” errors
- It will also scan any .html templates in /templates and /parts for incorrect block formatting.
wp:htmlblocks that need replacing with editable native alternatives- Incorrect style attribute paths (for example,
style.typography.colordoes not exist; the correct path isstyle.color.text) - Missing required classes, such as
wp-block-liston<ul>elements inside list blocks - Zero JavaScript console errors on the frontend
Example prompt
Use the WordPress Studio MCP server and the theme validate skill to validate all of the block template output in this theme.
What makes this stage genuinely useful is the feedback loop. Claude Code can see the running site through the MCP connection, make a fix, verify the result, and continue, without you manually opening each template in the Site Editor and hunting for errors. Fixing block and template validation issues by hand is slow, repetitive work. Having the agent do it against a live site is considerably faster, and it catches errors that are easy to miss when you are only reading files.
In my case, the most common errors were wp:html blocks that the Stitch skill had generated for logo and icon elements and incorrectly formatted template part block parameters. These need to be replaced with wp:site-title, wp:site-logo, or wp:paragraph with emoji for simple icons. There were also a handful of list blocks missing the wp-block-list class, and a couple of custom CSS paths in the block markup that WordPress rejected and needed correcting.
For the icons, I actually ended up using the fantastic The Icon Block plugin from Nick Diego and replacing them all with SVGs. The Icon Block plugin registers a single, easy-to-use block that allows you to add custom SVG icons and graphics to the WordPress block editor.
Note: The skill built some reusable patterns for me, which are .php files that live in the /patterns folder within the theme. I found I had to explicitly ask it to validate those as well, as it had overlooked them on several occasions.
The Full Pipeline at a Glance
The full sequence from start to finish:
- Design in Google Stitch — Prompt and refine your layout until you are happy with it, then download the HTML export of all the files.
- Install Agent Skills — Add the
stitch-to-wp-theme-skillto Claude Code and install the WordPress Studio skills. - Run the Stitch conversion — Point Claude Code at your Stitch export folder and let the
stitch-to-wp-theme-skillgenerate the initial theme. - Set up WordPress Studio — Create a local site, install your generated theme, and activate it.
- Connect Studio to Claude Code via MCP — Copy the MCP config from Studio’s settings and add it to Claude Code.
- Validate and fix — Use WordPress St
udiosskill’s validation component to find and fix block errors against the live local site. - Review and edit — Go through the Site Editor yourself, check all templates, and make any final adjustments the agent has not handled.
Limitations and Honest Observations
The Stitch skill is community-built and early. It handles a wide range of cases well, but it will not be perfect for every design. Complex interactive components like carousels, filtering, and any other custom blocks still need proper development attention. The skill is aware of this and will instruct Claude to create custom blocks for those cases, but writing the actual JavaScript and PHP is still your responsibility. It also did not add a build process for those using @wordpress/scripts and I had to add that to a package.json file myself, no real hassle though.
The MCP validation loop is not a substitute for understanding block themes. When Claude Code suggests a fix, you still need to be able to evaluate whether it is correct. If you have no familiarity with theme.json or block markup, some of the changes could be opaque.
This workflow suits experienced WordPress developers more than beginners. It accelerates people who already understand block theme structure. If you are learning block themes for the first time, I would work through a manual theme build first so you understand what the tools are generating.
Stitch is in beta, and the exports vary. Some designs produce clean, well-structured HTML; others are thin on configuration or inconsistent in their use of Tailwind. If you are getting a high volume of conversion errors, the design itself may be the issue rather than the skill.
The Result
The result is the working block theme you see on this site, built from a design I actually wanted, with far less manual scaffolding than if I had started from scratch. The design tokens from Stitch translated cleanly into theme.json, the patterns cover all the main page sections, and the Site Editor works without “Unsupported” blocks or validation errors.
I still spent time editing patterns, adjusting typography, and making decisions the tools could not make for me. But the pipeline removed what I estimate would have been a couple of days of mechanical setup work, and it gave me a clean, properly structured theme to start from.
If you are comfortable with block themes and want to bring a design into WordPress without starting from an empty boilerplate, this pipeline is worth trying. If you do, particularly if you run into block errors the validation step does not catch, or if you find a better way to prompt Stitch for cleaner exports, I would be interested to hear about it in the comments.
Caveat: I’m still working on a few sections of the theme, as it’s not perfect, and I’ve noticed some small inconsistencies. However, overall, I’m happy with the results so far.
It’s also worth noting that Stitch’s AI claimed that my previous design looked like it was from 2009 when it was researching and that it could do with an update, which was a fair observation 😆
Leave a Reply